HTML5 画布中的直线
线是简单的图形基元。 线是连接两个点的对象。
在 HTML5 画布中,使用path对象创建一行。 路径是由线段连接的点的列表,这些线段可以具有不同的形状(弯曲或不弯曲),不同的宽度和不同的颜色。 在路径对象内,使用lineTo()方法创建一条线。
直线
下面的示例绘制两条线。
lines.html
<!DOCTYPE html>
<html>
<head>
<title>HTML5 canvas lines</title>
<script>
    function draw() {
        var canvas = document.getElementById('myCanvas');
        var ctx = canvas.getContext('2d');

        ctx.beginPath();
        ctx.moveTo(20, 20);
        ctx.lineTo(250, 150);
        ctx.stroke();

        ctx.beginPath();
        ctx.moveTo(20, 20);
        ctx.lineTo(250, 250);
        ctx.lineWidth = 5;
        ctx.stroke();
    }
</script>
</head>

<body onload="draw();">
    <canvas id="myCanvas" width="350" height="350">
    </canvas>
</body>
</html>
画了两条线。 第二行较粗。
ctx.beginPath();
beginPath()方法创建一个新路径。 创建后,随后的绘图命令将直接进入路径并用于构建路径。
ctx.moveTo(20, 20);
moveTo()方法将笔移动到 x 和 y 指定的坐标。
ctx.lineTo(250, 150);
lineTo()方法从当前绘制位置到 x 和 y 指定的位置绘制一条线。
ctx.stroke();
stroke()方法通过描边轮廓绘制线条。
ctx.lineWidth = 5;
lineWidth设置第二行的宽度; 线较粗。
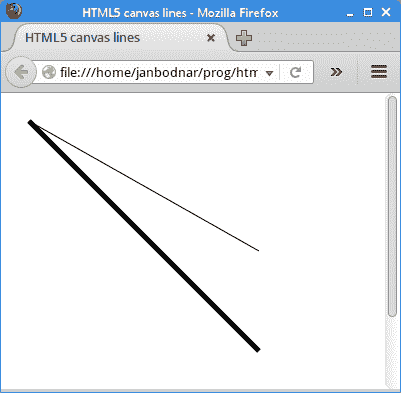
图:直线
模糊直线
具有奇数宽度的线似乎模糊。 这是因为这些线是在画布的网格线之间绘制的。 有一个快速的解决方案-将坐标移动半个单位。
crisp_lines.html
<!DOCTYPE html>
<html>
<head>
<title>HTML5 canvas crisp lines</title>
<script>
    function draw() {
        var canvas = document.getElementById('myCanvas');
        var ctx = canvas.getContext('2d');

        ctx.lineWidth = 1
        ctx.beginPath();
        ctx.moveTo(20, 20);
        ctx.lineTo(250, 20);
        ctx.stroke();

        ctx.beginPath();
        ctx.moveTo(20, 40);
        ctx.lineTo(250, 40);
        ctx.stroke();

        ctx.translate(0.5, 0.5);

        ctx.beginPath();
        ctx.moveTo(20, 60);
        ctx.lineTo(250, 60);
        ctx.stroke();

        ctx.beginPath();
        ctx.moveTo(20, 80);
        ctx.lineTo(250, 80);
        ctx.stroke();
    }
</script>
</head>

<body onload="draw();">
    <canvas id="myCanvas" width="350" height="350">
    </canvas>
</body>
</html>
该示例绘制了四行。 前两个略微模糊,其他两个更平滑。
ctx.lineWidth = 1
我们有一条宽度奇数的线。
ctx.translate(0.5, 0.5);
这是消除线条模糊的快速解决方案。 translate()方法将坐标系移动半个单位。
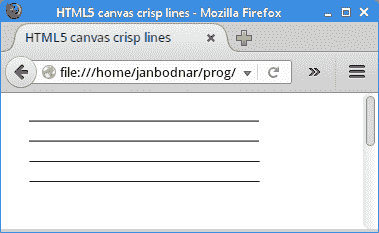
图:酥脆的线
笔划线
可以使用各种笔划线来绘制线。 笔划线是通过混合不透明部分和透明部分而创建的图案。 使用画布上下文的setLineDash()方法指定笔划线。
line_dashes.html
<!DOCTYPE html>
<html>
<head>
<title>HTML5 canvas line dashes</title>
<script>
    function draw() {
        var canvas = document.getElementById('myCanvas');
        var ctx = canvas.getContext('2d');

        ctx.translate(0.5, 0.5);

        ctx.beginPath();
        ctx.setLineDash([2]);
        ctx.moveTo(10, 10);
        ctx.lineTo(250, 10);
        ctx.stroke();

        ctx.beginPath();
        ctx.setLineDash([7, 2]);
        ctx.moveTo(10, 20);
        ctx.lineTo(250, 20);
        ctx.stroke();

        ctx.beginPath();
        ctx.setLineDash([4, 4, 1]);
        ctx.moveTo(10, 30);
        ctx.lineTo(250, 30);
        ctx.stroke();
    }
</script>
</head>

<body onload="draw();">
    <canvas id="myCanvas" width="350" height="250">
    </canvas>
</body>
</html>
该示例绘制了三条具有不同笔划线图案的线。
ctx.setLineDash([2]);
这条线将交替显示 2 个坐标单位的不透明和透明部分。
ctx.setLineDash([4, 4, 1]);
在这里,笔划线由以下模式组成:4 个单位已绘制,4 个未绘制单位,1 个已绘制单位。
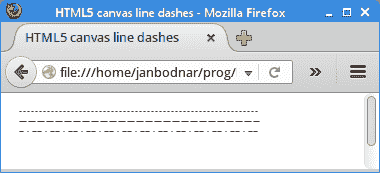
图:虚线
端盖
端盖是应用于未封闭子路径和破折线段末端的装饰。 Java 2D 中有三种不同的端盖:'square','round'和'butt'。
'butt'- 结束未封闭的子路径和虚线段,不添加任何修饰。'round'- 用圆形装饰结束未封闭的子路径和虚线段,该圆形装饰的半径等于笔的宽度的一半。'square'- 以方形投影结束未封闭的子路径和虚线段,该方形投影超出段的末端并延伸到等于线宽一半的距离。
line_caps.html
<!DOCTYPE html>
<html>
<head>
<title>HTML5 canvas line caps</title>
<script>
    function draw() {
        var canvas = document.getElementById('myCanvas');
        var ctx = canvas.getContext('2d');

        ctx.translate(0.5, 0.5);
        ctx.lineWidth = 8;

        ctx.beginPath();
        ctx.lineCap = 'square';
        ctx.moveTo(10, 10);
        ctx.lineTo(250, 10);
        ctx.stroke();

        ctx.beginPath();
        ctx.lineCap = 'round';
        ctx.moveTo(10, 30);
        ctx.lineTo(250, 30);
        ctx.stroke();

        ctx.beginPath();
        ctx.lineCap = 'butt';
        ctx.moveTo(10, 50);
        ctx.lineTo(250, 50);
        ctx.stroke();

        ctx.lineWidth = 1;
        ctx.beginPath();
        ctx.moveTo(10, 0);
        ctx.lineTo(10, 60);
        ctx.stroke();

        ctx.beginPath();
        ctx.moveTo(250, 0);
        ctx.lineTo(250, 60);
        ctx.stroke();

        ctx.beginPath();
        ctx.moveTo(254, 0);
        ctx.lineTo(254, 60);
        ctx.stroke();
    }
</script>
</head>

<body onload="draw();">
    <canvas id="myCanvas" width="350" height="250">
    </canvas>
</body>
</html>
在我们的示例中,我们显示了所有三种类型的端盖。
ctx.lineWidth = 8;
我们增加线条的宽度,以便更好地看到盖帽。
ctx.lineCap = 'square';
线宽由lineCap上下文属性指定。
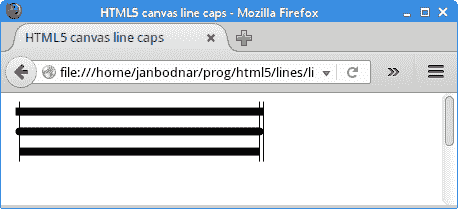
图:直线的端帽
垂直线强调线的大小差异。
连接
线连接是应用于两个路径段的交点以及子路径端点的交点的修饰。 一共有三种装饰:'bevel','miter'和'round'。
'bevel'- 通过将宽轮廓的外角与直线段相连来连接路径段。'miter'- 通过扩展路径段的外部边缘直到它们交汇来连接路径段。'round'- 通过以线宽一半的半径四舍五入拐角来连接路径段。
line_joins.html
<!DOCTYPE html>
<html>
<head>
<title>HTML5 canvas line joins</title>
<script>
    function draw() {
        var canvas = document.getElementById('myCanvas');
        var ctx = canvas.getContext('2d');

        ctx.translate(0.5, 0.5);
        ctx.lineWidth = 8;

        ctx.lineJoin = 'miter';
        ctx.strokeRect(10, 10, 100, 100);

        ctx.lineJoin = 'bevel';
        ctx.strokeRect(130, 10, 100, 100);

        ctx.lineJoin = 'round';
        ctx.strokeRect(260, 10, 100, 100);
    }
</script>
</head>

<body onload="draw();">
    <canvas id="myCanvas" width="450" height="350">
    </canvas>
</body>
</html>
此代码示例显示了三个不同的线联接在起作用。
ctx.lineWidth = 8;
用细线很难分辨连接类型之间的区别。 因此,通过将lineWidth设置为 8 个单位,可以使线条更粗。
ctx.lineJoin = 'miter';
线连接使用lineJoin属性设置。
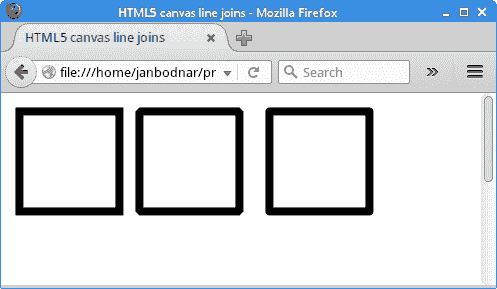
图:Joins
贝塞尔曲线
贝塞尔曲线是由数学公式定义的曲线(样条线)。 绘制曲线的数学方法由 PierreBézier 在 1960 年代后期创建,用于雷诺的汽车制造。
画布上下文的bezierCurveTo()方法将三次贝塞尔曲线添加到路径。 它需要三个点:前两个点是控制点,第三个点是终点。 起点是当前路径中的最后一个点,可以在创建贝塞尔曲线之前使用moveTo()对其进行更改。 通过移动控制点来修改形状。
bezier_curve.html
<!DOCTYPE html>
<html>
<head>
<title>HTML5 canvas Bézier curve</title>
<meta charset="utf-8">
<script>
    function draw() {

        var canvas = document.getElementById('myCanvas');
        var ctx = canvas.getContext('2d');

        ctx.beginPath();
        ctx.moveTo(20, 60);
        ctx.bezierCurveTo(80, 20, 180, 160, 250, 50);
        ctx.stroke();

        ctx.fillStyle = 'cadetblue';
        ctx.fillRect(80, 20, 4, 4);
        ctx.fillRect(180, 160, 4, 4);
    }
</script>
</head>

<body onload="draw();">
    <canvas id="myCanvas" width="350" height="350">
    </canvas>
</body>
</html>
该示例绘制了一条贝塞尔曲线。
ctx.moveTo(20, 60);
通过moveTo()方法,我们定义了曲线的起点。
ctx.bezierCurveTo(80, 20, 180, 160, 250, 50);
使用bezierCurveTo()方法,我们在路径上添加了贝塞尔曲线。 前两个点是控制点; 最后一点是曲线的终点。
ctx.fillStyle = 'cadetblue';
ctx.fillRect(80, 20, 4, 4);
ctx.fillRect(180, 160, 4, 4);
这些线绘制曲线的控制点。
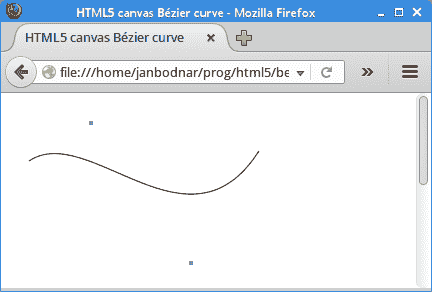
图:贝塞尔曲线
在 HTML5 画布教程的这一部分中,我们使用了线条。
