PyQt 中的QPropertyAnimation
PyQt 中的 QPropertyAnimation 显示了如何使用QPropertyAnimation在 PyQt 中创建动画。 在示例中,我们对对象的大小,颜色和位置进行了动画处理。 来源和球图像可以在作者的 Github 仓库中找到。
QPropertyAnimation
QPropertyAnimation内插 PyQt 属性。 声明属性的类必须为为QObject。
QPropertyAnimation方法
下表显示了一些重要的QPropertyAnimation方法:
| 名称 | 描述 |
|---|---|
start() |
开始动画 |
stop() |
终止动画 |
setStartValue() |
设置动画的起始值 |
setEndValue() |
设置动画的结束值 |
setDuration() |
设置动画的持续时间,以毫秒为单位 |
setKeyValueAt() |
在给定步骤以给定值创建关键帧 |
setLoopCount() |
设置动画的重复次数 |
使用QPropertyAnimation设置动画大小
在第一个示例中,我们为小部件的大小设置动画。
size_anim.py
#!/usr/bin/python3
# -*- coding: utf-8 -*-

'''
ZetCode Advanced PyQt5 tutorial

This program animates the size of a
widget with QPropertyAnimation.

Author: Jan Bodnar
Website: zetcode.com
Last edited: August 2017
'''

from PyQt5.QtWidgets import QWidget, QApplication, QFrame, QPushButton
from PyQt5.QtCore import QRect, QPropertyAnimation
import sys

class Example(QWidget):

    def __init__(self):
        super().__init__()

        self.initUI()

    def initUI(self):

        self.button = QPushButton("Start", self)
        self.button.clicked.connect(self.doAnim)
        self.button.move(30, 30)

        self.frame = QFrame(self)
        self.frame.setFrameStyle(QFrame.Panel | QFrame.Raised)
        self.frame.setGeometry(150, 30, 100, 100)

        self.setGeometry(300, 300, 380, 300)
        self.setWindowTitle('Animation')
        self.show()

    def doAnim(self):

        self.anim = QPropertyAnimation(self.frame, b"geometry")
        self.anim.setDuration(10000)
        self.anim.setStartValue(QRect(150, 30, 100, 100))
        self.anim.setEndValue(QRect(150, 30, 200, 200))
        self.anim.start()

if __name__ == "__main__":

    app = QApplication([])
    ex = Example()
    ex.show()
    app.exec_()
该示例对QFrame小部件的大小进行动画处理。
self.button = QPushButton("Start", self)
self.button.clicked.connect(self.doAnim)
self.button.move(30, 30)
动画以QPushButton开始。
self.anim = QPropertyAnimation(self.frame, b"geometry")
QPropertyAnimation已创建。 第一个参数是要动画的目标对象; 在我们的例子中,我们为QFrame小部件设置了动画。 第二个参数是将要更改的属性。
self.anim.setDuration(10000)
setDuration()设置动画的持续时间(以毫秒为单位)。
self.anim.setStartValue(QRect(150, 30, 100, 100))
self.anim.setEndValue(QRect(150, 30, 200, 200))
使用setStartValue()和setEndValue()分别定义动画的开始和结束值。
self.anim.start()
动画从start()方法开始。
使用QPropertyAnimation设置颜色的动画
下面的示例对小部件的颜色进行动画处理。 由于没有颜色属性,因此我们必须创建一个。
color_anim.py
#!/usr/bin/python3
# -*- coding: utf-8 -*-

'''
ZetCode Advanced PyQt5 tutorial

This programs animates the color of a QLabel.

Author: Jan Bodnar
Website: zetcode.com
Last edited: August 2017
'''

from PyQt5.QtWidgets import (QWidget, QApplication, QPushButton,
        QLabel, QHBoxLayout, QSizePolicy)
from PyQt5.QtGui import QColor
from PyQt5.QtCore import QPropertyAnimation, pyqtProperty
import sys

class MyLabel(QLabel):

    def __init__(self, text):
        super().__init__(text)

    def _set_color(self, col):

        palette = self.palette()
        palette.setColor(self.foregroundRole(), col)
        self.setPalette(palette)

    color = pyqtProperty(QColor, fset=_set_color)

class Example(QWidget):

    def __init__(self):
        super().__init__()

        self.initUI()

    def initUI(self):

        hbox = QHBoxLayout(self)

        self.button = QPushButton("Start", self)
        self.button.setSizePolicy(QSizePolicy.Fixed, QSizePolicy.Fixed)
        hbox.addWidget(self.button)

        hbox.addSpacing(40)

        self.label = MyLabel("Summer")
        font = self.label.font()
        font.setPointSize(35)
        self.label.setFont(font)
        hbox.addWidget(self.label)

        self.anim = QPropertyAnimation(self.label, b"color")
        self.anim.setDuration(2500)
        self.anim.setLoopCount(2)
        self.anim.setStartValue(QColor(0, 0, 0))
        self.anim.setEndValue(QColor(255, 255, 255))

        self.button.clicked.connect(self.anim.start)

        self.setGeometry(300, 300, 380, 250)
        self.setWindowTitle('Color anim')
        self.show()

if __name__ == "__main__":

    app = QApplication([])
    ex = Example()
    ex.show()
    app.exec_()
该示例逐渐更改QLabel的颜色值。
class MyLabel(QLabel):

    def __init__(self, text):
        super().__init__(text)

    def _set_color(self, col):

        palette = self.palette()
        palette.setColor(self.foregroundRole(), col)
        self.setPalette(palette)

    color = pyqtProperty(QColor, fset=_set_color)
QLabel没有颜色属性; 因此,我们用pyqtProperty定义一个。 更改此属性将更新标签的颜色。
self.anim = QPropertyAnimation(self.label, b"color")
QPropertyAnimation更改标签窗口小部件的color属性。
self.anim.setLoopCount(2)
使用setLoopCount()方法,我们可以更改动画运行的次数。
self.anim.setStartValue(QColor(0, 0, 0))
self.anim.setEndValue(QColor(255, 255, 255))
我们设置开始和结束颜色值。
使用QPropertyAnimation沿曲线动画
以下示例使球沿贝塞尔曲线动画。
anim_along_curve.py
#!/usr/bin/python3
# -*- coding: utf-8 -*-

'''
ZetCode Advanced PyQt5 tutorial

This programs animates a ball object
along a curve.

Author: Jan Bodnar
Website: zetcode.com
Last edited: August 2017
'''

from PyQt5.QtWidgets import QApplication, QWidget, QLabel
from PyQt5.QtGui import QPainter, QPixmap, QPainterPath
from PyQt5.QtCore import QObject, QPointF, QPropertyAnimation, pyqtProperty
import sys

class Ball(QLabel):

    def __init__(self, parent):
        super().__init__(parent)

        pix = QPixmap("ball.png")
        self.h = pix.height()
        self.w = pix.width()

        self.setPixmap(pix)

    def _set_pos(self, pos):

        self.move(pos.x() - self.w/2, pos.y() - self.h/2)

    pos = pyqtProperty(QPointF, fset=_set_pos)

class Example(QWidget):

    def __init__(self):
        super().__init__()

        self.initView()
        self.initAnimation()

    def initView(self):

        self.path = QPainterPath()
        self.path.moveTo(30, 30)
        self.path.cubicTo(30, 30, 200, 350, 350, 30)

        self.ball = Ball(self)

        self.ball.pos = QPointF(30, 30)

        self.setWindowTitle("Animation along curve")
        self.setGeometry(300, 300, 400, 300)
        self.show()

    def paintEvent(self, e):

        qp = QPainter()
        qp.begin(self)
        qp.setRenderHint(QPainter.Antialiasing)
        qp.drawPath(self.path)
        qp.end()

    def initAnimation(self):

        self.anim = QPropertyAnimation(self.ball, b'pos')
        self.anim.setDuration(7000)

        self.anim.setStartValue(QPointF(30, 30))

        vals = [p/100 for p in range(0, 101)]

        for i in vals:
            self.anim.setKeyValueAt(i, self.path.pointAtPercent(i))

        self.anim.setEndValue(QPointF(350, 30))
        self.anim.start()

if __name__ == '__main__':

    app = QApplication(sys.argv)
    ex = Example()
    sys.exit(app.exec_())
该示例在窗口上绘制一条曲线。 沿绘制的曲线为球对象设置动画。
class Ball(QLabel):

    def __init__(self, parent):
        super().__init__(parent)

        pix = QPixmap("ball.png")
        self.h = pix.height()
        self.w = pix.width()

        self.setPixmap(pix)
球显示在QLabel小部件中。
def _set_pos(self, pos):

    self.move(pos.x() - self.w/2, pos.y() - self.h/2)

pos = pyqtProperty(QPointF, fset=_set_pos)
我们调整球的位置; 我们希望将标签的中间放置在曲线上。
self.path = QPainterPath()
self.path.moveTo(30, 30)
self.path.cubicTo(30, 30, 200, 350, 350, 30)
贝塞尔曲线是用QPainterPath创建的。 其cubicTo()方法以起点,控制点和终点为参数。
def paintEvent(self, e):

    qp = QPainter()
    qp.begin(self)
    qp.setRenderHint(QPainter.Antialiasing)
    qp.drawPath(self.path)
    qp.end()
在paintEvent()方法中使用drawPath()方法绘制曲线。
self.anim = QPropertyAnimation(self.ball, b'pos')
我们用QPropertyAnimation为球的pos属性设置动画。
vals = [p/100 for p in range(0, 101)]
通过 Python 列表推导式,我们创建了动画步骤列表。 步长是介于 0 和 1 之间的值。
for i in vals:
    self.anim.setKeyValueAt(i, self.path.pointAtPercent(i))
使用setKeyValueAt(),我们定义给定步骤中球的位置。 使用pointAtPercent(),我们可以在路径的给定百分比处获得QPointF。
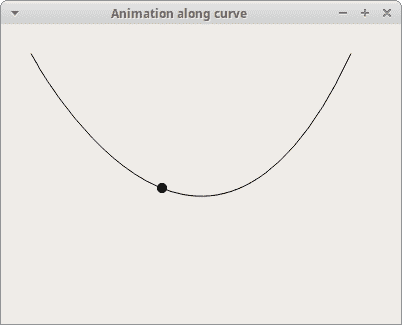
图:沿曲线的动画
图形视图框架中的QPropertyAnimation
QPropertyAnimation可以在 Graphics View Framework 中为图形项目设置动画。 动画对象必须继承自QObject和QGraphicsItem。
gvf_anim.py
#!/usr/bin/python3
# -*- coding: utf-8 -*-

'''
ZetCode Advanced PyQt5 tutorial

This programs animates a ball object.

Author: Jan Bodnar
Website: zetcode.com
Last edited: August 2017
'''

from PyQt5.QtWidgets import (QApplication, QGraphicsView,
        QGraphicsPixmapItem, QGraphicsScene)
from PyQt5.QtGui import QPainter, QPixmap
from PyQt5.QtCore import (QObject, QPointF,
        QPropertyAnimation, pyqtProperty)
import sys

class Ball(QObject):

    def __init__(self):
        super().__init__()

        self.pixmap_item = QGraphicsPixmapItem(QPixmap("ball.png"))

    def _set_pos(self, pos):
        self.pixmap_item.setPos(pos)

    pos = pyqtProperty(QPointF, fset=_set_pos)

class Example(QGraphicsView):

    def __init__(self):
        super().__init__()

        self.initView()

    def initView(self):

        self.ball = Ball()

        self.anim = QPropertyAnimation(self.ball, b'pos')
        self.anim.setDuration(8000)
        self.anim.setStartValue(QPointF(5, 30))

        self.anim.setKeyValueAt(0.3, QPointF(80, 30))
        self.anim.setKeyValueAt(0.5, QPointF(200, 30))
        self.anim.setKeyValueAt(0.8, QPointF(250, 250))

        self.anim.setEndValue(QPointF(290, 30))

        self.scene = QGraphicsScene(self)
        self.scene.setSceneRect(0, 0, 300, 300)
        self.scene.addItem(self.ball.pixmap_item)
        self.setScene(self.scene)

        self.setWindowTitle("Ball animation")
        self.setRenderHint(QPainter.Antialiasing)
        self.setGeometry(300, 300, 500, 350)

        self.anim.start()

        self.show()

if __name__ == '__main__':

    app = QApplication(sys.argv)
    ex = Example()
    sys.exit(app.exec_())
该示例在 Graphics View Framework 中使用QPropertyAnimation为球对象设置动画。
class Ball(QObject):

    def __init__(self):
        super().__init__()

        self.pixmap_item = QGraphicsPixmapItem(QPixmap("ball.png"))

    def _set_pos(self, pos):
        self.pixmap_item.setPos(pos)

    pos = pyqtProperty(QPointF, fset=_set_pos)
Sice PyQt 不支持多重继承,我们使用合成技术来满足前面提到的条件。
class Example(QGraphicsView):

    def __init__(self):
        super().__init__()

        self.initView()
QGraphicsView在可滚动视口中可视化QGraphicsScene的内容。
self.anim = QPropertyAnimation(self.ball, b'pos')
我们将使用QPropertyAnimation为球对象的position属性设置动画。
self.anim.setDuration(8000)
动画持续八秒钟。
self.anim.setKeyValueAt(0.3, QPointF(80, 30))
self.anim.setKeyValueAt(0.5, QPointF(200, 30))
self.anim.setKeyValueAt(0.8, QPointF(250, 250))
使用setKeyValueAt()方法,我们在给定步骤创建具有给定值的关键帧。 换句话说,我们定义了动画给定步骤中球的位置。
self.scene = QGraphicsScene(self)
self.scene.setSceneRect(0, 0, 300, 300)
self.scene.addItem(self.ball.pixmap_item)
创建QGraphicsScene并将球添加到场景中。 它提供了一个用于管理大量 2D 图形项目的界面。 注意,我们将ball属性添加到场景中,而不是ball对象。
在本教程中,我们使用QPropertyAnimation创建了动画。
您可能也对以下相关教程感兴趣: PyQt5 教程, QNetworkAccessManager教程和 Python 教程。
