基本的 JavaFX 控件
控件是应用的基本构建块。 Control是场景图中的一个可由用户操纵的节点。 它以对用户一致且可预测的方式支持常见的用户交互。 JavaFX 具有广泛的内置控件。 在本章中,我们涵盖五个控件:Label,CheckBox,ChoiceBox,Slider和ProgressBar。 还简要提到了ImageView和TextField控件。
Label
Label是不可编辑的文本控件。 标签可以使用省略号或截断符来调整字符串的大小以使其适合。
LabelEx.java
package com.zetcode;

import javafx.application.Application;
import javafx.geometry.Insets;
import javafx.scene.Scene;
import javafx.scene.control.Label;
import javafx.scene.layout.HBox;
import javafx.stage.Stage;

/**
 * ZetCode JavaFX tutorial
 *
 * This program shows lyrics in a Label
 * control.
 *
 * Author: Jan Bodnar
 * Website: zetcode.com
 * Last modified: June 2015
 */

public class LabelEx extends Application {

    String lyrics = "It's way too late to think of\n"
            + "Someone I would call now\n"
            + "And neon signs got tired\n"
            + "Red eye flights help the stars out\n"
            + "I'm safe in a corner\n"
            + "Just hours before me\n"
            + "\n"
            + "I'm waking with the roaches\n"
            + "The world has surrendered\n"
            + "I'm dating ancient ghosts\n"
            + "The ones I made friends with\n"
            + "The comfort of fireflies\n"
            + "Long gone before daylight\n"
            + "\n"
            + "And if I had one wishful field tonight\n"
            + "I'd ask for the sun to never rise\n"
            + "If God leant his voice for me to speak\n"
            + "I'd say go to bed, world\n"
            + "\n"
            + "I've always been too late\n"
            + "To see what's before me\n"
            + "And I know nothing sweeter than\n"
            + "Champaign from last New Years\n"
            + "Sweet music in my ears\n"
            + "And a night full of no fears\n"
            + "\n"
            + "But if I had one wishful field tonight\n"
            + "I'd ask for the sun to never rise\n"
            + "If God passed a mic to me to speak\n"
            + "I'd say stay in bed, world\n"
            + "Sleep in peace";

    @Override
    public void start(Stage stage) {

        initUI(stage);
    }

    private void initUI(Stage stage) {

        HBox root = new HBox();
        root.setPadding(new Insets(10));

        Label lbl = new Label(lyrics);
        root.getChildren().add(lbl);

        Scene scene = new Scene(root);

        stage.setTitle("No sleep");
        stage.setScene(scene);
        stage.show();
    }

    public static void main(String[] args) {
        launch(args);
    }
}
该示例显示了 Cardigans 的歌曲的歌词。
String lyrics = "It's way too late to think of\n"
        + "Someone I would call now\n"
        + "And neon signs got tired\n"
        + "Red eye flights help the stars out\n"
...
该字符串由多行文本组成。
HBox root = new HBox();
root.setPadding(new Insets(10));
标签控件放置在HBox中。 我们在盒子周围放了一些填充物。
Label lbl = new Label(lyrics);
创建一个Label控件。 它以字符串作为唯一参数。
root.getChildren().add(lbl);
标签已添加到容器中。
labelFor属性
labelFor属性指定在按下助记符时将键盘焦点发送到的节点。
LabelForEx.java
package com.zetcode;

import javafx.application.Application;
import javafx.geometry.HPos;
import javafx.geometry.Insets;
import javafx.scene.Scene;
import javafx.scene.control.Label;
import javafx.scene.control.TextField;
import javafx.scene.layout.GridPane;
import javafx.stage.Stage;

/**
 * ZetCode JavaFX tutorial
 *
 * This program uses the labelFor property to
 * send focus to a specified text field.
 *
 * Author: Jan Bodnar
 * Website: zetcode.com
 * Last modified: June 2015
 */

public class LabelForEx extends Application {

    @Override
    public void start(Stage stage) {

        initUI(stage);
    }

    private void initUI(Stage stage) {

        GridPane root = new GridPane();
        root.setVgap(10);
        root.setHgap(5);
        root.setPadding(new Insets(10));

        Label lbl1 = new Label("_Name:");
        Label lbl2 = new Label("_Address:");
        Label lbl3 = new Label("_Occupation:");

        TextField field1 = new TextField();
        TextField field2 = new TextField();
        TextField field3 = new TextField();

        lbl1.setLabelFor(field1);
        lbl1.setMnemonicParsing(true);
        lbl2.setLabelFor(field2);
        lbl2.setMnemonicParsing(true);
        lbl3.setLabelFor(field3);
        lbl3.setMnemonicParsing(true);

        root.add(lbl1, 0, 0);
        root.add(field1, 2, 0);
        root.add(lbl2, 0, 1);
        root.add(field2, 2, 1);
        root.add(lbl3, 0, 2);
        root.add(field3, 2, 2);

        GridPane.setHalignment(lbl1, HPos.RIGHT);
        GridPane.setHalignment(lbl2, HPos.RIGHT);
        GridPane.setHalignment(lbl3, HPos.RIGHT);

        Scene scene = new Scene(root);

        stage.setTitle("TextField");
        stage.setScene(scene);
        stage.show();
    }

    public static void main(String[] args) {
        launch(args);
    }
}
该示例使用labelFor属性和助记符将焦点转移到指定的文本字段。
GridPane root = new GridPane();
root.setVgap(10);
root.setHgap(5);
root.setPadding(new Insets(10));
我们的应用是一个典型的基于表单的程序。 GridPane非常适合此。 我们在控件周围以及控件之间设置了一些空间。
Label lbl1 = new Label("_Name:");
Label lbl2 = new Label("_Address:");
Label lbl3 = new Label("_Occupation:");
创建了三个Labels。 下划线字符位于助记键之前。
TextField field1 = new TextField();
TextField field2 = new TextField();
TextField field3 = new TextField();
TextField是用于编辑单行未格式化文本的控件。 每个文本字段都放置在一个标签控件旁边。
lbl1.setLabelFor(field1);
setLabelFor()设置按下助记符时将焦点转移到的目标节点。
lbl1.setMnemonicParsing(true);
默认情况下,未为标签设置助记符。 我们必须使用setMnemonicParsing()方法启用它们。
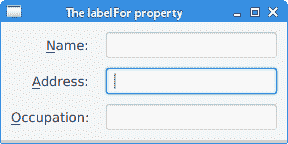
图:labelFor属性
在某些平台上,必须按无鼠标修饰符(通常为 Alt )以显示下划线。 在图中,通过按 Alt + A 将焦点转移到中间文本字段。
CheckBox
CheckBox是三态选择控制框,在选中时显示对勾或勾号。 默认情况下,控件具有两种状态:选中和未选中。 setAllowIndeterminate()使能第三种状态:不确定。
CheckBoxEx.java
package com.zetcode;

import javafx.application.Application;
import javafx.event.ActionEvent;
import javafx.geometry.Insets;
import javafx.scene.Scene;
import javafx.scene.control.CheckBox;
import javafx.scene.layout.HBox;
import javafx.stage.Stage;

/**
 * ZetCode JavaFX tutorial
 *
 * This program presents the
 * CheckBox control.
 *
 * Author: Jan Bodnar
 * Website: zetcode.com
 * Last modified: June 2015
 */

public class CheckBoxEx extends Application {

    @Override
    public void start(Stage stage) {

        initUI(stage);
    }

    private void initUI(Stage stage) {

        HBox root = new HBox();
        root.setPadding(new Insets(10, 0, 0, 10));

        CheckBox cbox = new CheckBox("Show title");
        cbox.setSelected(true);

        cbox.setOnAction((ActionEvent event) -> {
            if (cbox.isSelected()) {
                stage.setTitle("CheckBox");
            } else {
                stage.setTitle("");
            }
        });

        root.getChildren().add(cbox);

        Scene scene = new Scene(root, 300, 200);

        stage.setTitle("CheckBox");
        stage.setScene(scene);
        stage.show();
    }

    public static void main(String[] args) {
        launch(args);
    }
}
该示例根据是否选中该复选框来显示或隐藏窗口的标题。
CheckBox cbox = new CheckBox("Show title");
创建一个CheckBox控件。 指定的文本为其标签。
cbox.setSelected(true);
由于默认情况下窗口的标题是可见的,因此我们使用setSelected()方法检查控件。
cbox.setOnAction((ActionEvent event) -> {
    if (cbox.isSelected()) {
        stage.setTitle("CheckBox");
    } else {
        stage.setTitle("");
    }
});
使用setOnAction()方法,设置复选框的操作,该操作在触发复选框时被调用。 我们用isSelected()方法确定其状态。 根据当前状态,我们使用setTitle()方法显示或隐藏窗口标题。
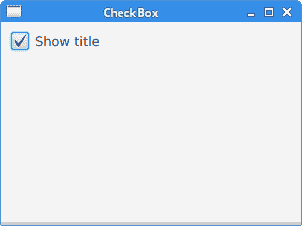
图:CheckBox
请注意复选框文本周围的蓝色矩形。 它表示此控件具有键盘焦点。 可以使用 Space 键选择和取消选中该复选框。
滑杆
Slider是一种控件,它使用户可以通过在有限间隔内滑动旋钮来以图形方式选择一个值。 滑块可以选择显示刻度线和标签,以指示不同的滑块位置值。
SliderEx.java
package com.zetcode;

import javafx.application.Application;
import javafx.beans.value.ChangeListener;
import javafx.beans.value.ObservableValue;
import javafx.geometry.Insets;
import javafx.geometry.Pos;
import javafx.scene.Scene;
import javafx.scene.control.Slider;
import javafx.scene.image.Image;
import javafx.scene.image.ImageView;
import javafx.scene.layout.HBox;
import javafx.stage.Stage;

/**
 * ZetCode JavaFX tutorial
 *
 * This program uses a Slider control to
 * manipulate the images of an ImageView.
 *
 * Author: Jan Bodnar
 * Website: zetcode.com
 * Last modified: June 2015
 */

public class SliderEx extends Application {

    private ImageView iview;
    private Image muteImg;
    private Image minImg;
    private Image maxImg;
    private Image medImg;

    @Override
    public void start(Stage stage) {

        initUI(stage);
    }

    private void initUI(Stage stage) {

        HBox root = new HBox(10);
        root.setAlignment(Pos.CENTER);
        root.setPadding(new Insets(15));

        loadImages();

        iview = new ImageView(muteImg);

        Slider slider = new Slider(0, 100, 0);
        slider.valueProperty().addListener(new MyChangeListener());

        Scene scene = new Scene(root);

        root.getChildren().addAll(slider, iview);

        stage.setTitle("Slider");
        stage.setScene(scene);
        stage.show();
    }

    private void loadImages() {

        muteImg = new Image("file:mute.png");
        minImg = new Image("file:min.png");
        maxImg = new Image("file:max.png");
        medImg = new Image("file:med.png");
    }

    private class MyChangeListener implements ChangeListener<Number> {

        @Override
        public void changed(ObservableValue<? extends Number> observable,
                Number oldValue, Number newValue) {

            Double value = newValue.doubleValue();

            if (value == 0) {
                iview.setImage(muteImg);
            } else if (value > 0 && value <= 30) {
                iview.setImage(minImg);
            } else if (value > 30 && value < 80) {
                iview.setImage(medImg);
            } else {
                iview.setImage(maxImg);
            }
        }
    }

    public static void main(String[] args) {
        launch(args);
    }
}
在代码示例中,我们显示了Slider和ImageView控件。 通过拖动滑块的旋钮,我们可以更改标签控件上的图像。
root.setAlignment(Pos.CENTER);
滑块和图像视图在行中居中。
iview = new ImageView(muteImg);
ImageView显示加载了Image类的图像。
Slider slider = new Slider(0, 100, 0);
将使用指定的最小值,最大值和当前值创建一个Slider控件。
slider.valueProperty().addListener(new MyChangeListener());
监听器已添加到滑块的值更改中。
Double value = newValue.doubleValue();

if (value == 0) {
    iview.setImage(muteImg);
} else if (value > 0 && value <= 30) {
    iview.setImage(minImg);
} else if (value > 30 && value < 80) {
    iview.setImage(medImg);
} else {
    iview.setImage(maxImg);
}
基于滑块的当前值,我们将适当的图像设置为图像视图。
private void loadImages() {

    muteImg = new Image("file:mute.png");
    minImg = new Image("file:min.png");
    maxImg = new Image("file:max.png");
    medImg = new Image("file:med.png");
}
loadImages()方法从磁盘加载图像。
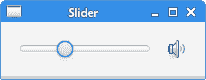
图:Slider
选择框
ChoiceBox用于向用户显示一小组预定义的选项。 当用户单击该框时,将显示一个选择列表。 一次只能选择一个选项。 未显示此列表时,将显示当前选择的选项。 ChoiceBox项目选择由SelectionModel处理。
ChoiceBoxEx.java
package com.zetcode;

import javafx.application.Application;
import javafx.beans.value.ObservableValue;
import javafx.collections.FXCollections;
import javafx.geometry.Insets;
import javafx.scene.Scene;
import javafx.scene.control.ChoiceBox;
import javafx.scene.control.Label;
import javafx.scene.control.SingleSelectionModel;
import javafx.scene.layout.VBox;
import javafx.stage.Stage;

/**
 * ZetCode JavaFX tutorial
 *
 * This program uses a ChoiceBox. The chosen
 * item is shown in a label.
 *
 * Author: Jan Bodnar
 * Website: zetcode.com
 * Last modified: June 2015
 */

public class ChoiceBoxEx extends Application {

    @Override
    public void start(Stage stage) {

        initUI(stage);
    }

    private void initUI(Stage stage) {

        VBox root = new VBox(35);
        root.setPadding(new Insets(10));

        Label lbl = new Label();

        ChoiceBox chbox = new ChoiceBox(FXCollections.observableArrayList(
                "Ubuntu", "Redhat", "Arch", "Debian", "Mint"));

        SingleSelectionModel model = chbox.getSelectionModel();

        model.selectedItemProperty().addListener((ObservableValue observable,
                Object oldValue, Object newValue) -> {

            lbl.setText(newValue.toString());
        });

        root.getChildren().addAll(chbox, lbl);

        Scene scene = new Scene(root, 300, 250);

        stage.setTitle("ChoiceBox");
        stage.setScene(scene);
        stage.show();
    }

    public static void main(String[] args) {
        launch(args);
    }
}
在我们的示例中,我们有一个选择框和一个标签。 选择框包含一个字符串列表,这些字符串表示 Linux 发行版的名称。 从选择框中选择的项目显示在标签中。
Label lbl = new Label();
此Label显示了从选择框中选择的当前项目。
ChoiceBox chbox = new ChoiceBox(FXCollections.observableArrayList(
        "Ubuntu", "Redhat", "Arch", "Debian", "Mint"));
创建了ChoiceBox。 它以可观察的数组列表作为参数。
SingleSelectionModel model = chbox.getSelectionModel();

model.selectedItemProperty().addListener((ObservableValue observable,
        Object oldValue, Object newValue) -> {

    lbl.setText(newValue.toString());
});
要实现监听器,我们需要使用getSelectionModel()方法获得选择模型。 该模型包含可观察的selectedItem属性。 在处理器方法内部,我们获取选定的值并将其设置为标签。
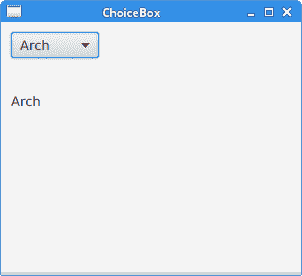
图:ChoiceBox
进度条
ProgressBar是一个控件,用于指示带有完成条的特定任务的处理。
ProgressBarEx.java
package com.zetcode;

import javafx.animation.KeyFrame;
import javafx.animation.KeyValue;
import javafx.animation.Timeline;
import javafx.application.Application;
import javafx.event.ActionEvent;
import javafx.geometry.Insets;
import javafx.geometry.Pos;
import javafx.scene.Scene;
import javafx.scene.control.Button;
import javafx.scene.control.ProgressBar;
import javafx.scene.layout.HBox;
import javafx.stage.Stage;
import javafx.util.Duration;

/**
 * ZetCode JavaFX tutorial
 *
 * This program presents the ProgressBar control.
 *
 * Author: Jan Bodnar
 * Website: zetcode.com
 * Last modified: June 2015
 */

public class ProgressBarEx extends Application {

    @Override
    public void start(Stage stage) {

        initUI(stage);
    }

    private void initUI(Stage stage) {

        HBox root = new HBox(15);
        root.setAlignment(Pos.CENTER);
        root.setPadding(new Insets(10));

        ProgressBar pbar = new ProgressBar(0);
        pbar.setPrefWidth(150);

        KeyFrame frame1 = new KeyFrame(Duration.ZERO,
                new KeyValue(pbar.progressProperty(), 0));

        KeyFrame frame2 = new KeyFrame(Duration.seconds(3),
                new KeyValue(pbar.progressProperty(), 1));

        Timeline task = new Timeline(frame1, frame2);

        Button btn = new Button("Start");
        btn.setOnAction((ActionEvent actionEvent) -> {
            task.playFromStart();
        });

        root.getChildren().addAll(pbar, btn);

        Scene scene = new Scene(root);

        stage.setTitle("ProgressBar");
        stage.setScene(scene);
        stage.show();
    }

    public static void main(String[] args) {
        launch(args);
    }
}
该示例由进度条和按钮组成。 该按钮将启动进度条,并对其进行动画处理几秒钟。
ProgressBar pbar = new ProgressBar(0);
构造器使用给定的进度值创建一个新的ProgressBar。
KeyFrame frame1 = new KeyFrame(Duration.ZERO,
        new KeyValue(pbar.progressProperty(), 0));

KeyFrame frame2 = new KeyFrame(Duration.seconds(3),
        new KeyValue(pbar.progressProperty(), 1));

Timeline task = new Timeline(frame1, frame2);
此代码创建一个简单的动画任务。 动画由两个帧组成。 动画属性定义为KeyValues。
Button btn = new Button("Start");
btn.setOnAction((ActionEvent actionEvent) -> {
    task.playFromStart();
});
触发后,该按钮调用playFromStart()方法,该方法从初始位置开始向前播放动画。

图:ProgressBar
在 JavaFX 教程的这一部分中,我们介绍了基本的 JavaFX 控件。
