Qyoto 介绍
在 Qyoto C# 编程教程的这一部分中,我们将介绍并构建 Qyoto 库。 我们使用 C# 编程语言创建第一个 Qyoto 程序。
本教程的目的是帮助您开始使用 Qyoto 和 C# 。 可以在此处下载本教程中使用的图像。 我使用了 Gnome 项目的探戈图标包中的一些图标。 该教程是在 Qyoto 项目的维护者 Dimitar Dobrev 的帮助下创建的。
关于
Qyoto 是一个库,它提供 Qt 库与.NET 语言(如 C# 或 Visual Basic)的绑定。 Qt 是功能强大的跨平台应用开发框架。 它的母语是 C++ 。 Qyoto 是 KDE 桌面环境的一部分。 Qyoto 是使用SMOKE库创建的。 这是一个 KDE 项目,用于创建多种语言的绑定。 SMOKE 代表脚本元对象 Kompiler 引擎。
在 Linux 上构建 Qyoto
我们从最新资源构建 Qyoto 库。
$ git clone git://anongit.kde.org/smokegen
$ git clone git://anongit.kde.org/smokeqt
$ git clone git://anongit.kde.org/assemblygen
我们从 git 仓库下载源代码。
$ sudo apt-get install cmake-qt-gui
如果不存在,请安装cmake-qt-gui。
我们按以下顺序构建三个包:1)smokegen,2)smokeqt 和 3)assemblygen。 我们在三个目录中的每个目录中运行cmake-qt-gui。 我们指定源,构建目录,并将CMAKE_BUILD_TYPE设置为Release。 我们单击配置和生成按钮。 将目录更改为构建目录。 运行make和sudo make install。
$ export LD_LIBRARY_PATH=/usr/local/qt4/lib
在构建smokeqt包之前,我们设置一个环境变量。 每次构建后,我们运行sudo ldconfig命令。
$ ls /usr/local/lib/mono/qyoto
qyoto-qtcore.dll  qyoto-qtsvg.dll
qtscript.dll      qyoto-qtgui.dll      qyoto-qtuitools.dll
qttest.dll        qyoto-qtnetwork.dll  qyoto-qtwebkit.dll
qtuitools.dll     qyoto-qtopengl.dll   qyoto-qtxml.dll
qtwebkit.dll      qyoto-qtscript.dll   qyoto-qtxmlpatterns.dll
qyoto-phonon.dll  qyoto-qtsql.dll
我们在/usr/local/lib/mono/qyoto目录中有 Qyoto dll。
$ dmcs -r:/usr/local/lib/mono/qyoto/qyoto-qtcore.dll \
> -r:/usr/local/lib/mono/qyoto/qyoto-qtgui.dll donut.cs
上面的命令显示了如何编译甜甜圈示例。 mono C# 编译器的-r参数加载 Qt 程序集。 这是一个动态库。 该命令显示 Linux 系统上 dll 库的路径。
创建工具提示
第一个示例将显示一个工具提示。 工具提示是一个小的矩形窗口,它提供有关对象的简短信息。 它通常是一个 GUI 组件。 它是应用帮助系统的一部分。
using System;
using QtCore;
using QtGui;

/**
 * ZetCode Qyoto C# tutorial
 *
 * This program displays a
 * tooltip.
 *
 * @author Jan Bodnar
 * website zetcode.com
 * last modified October 2012
 */

public class QyotoApp : QWidget
{
    public QyotoApp()
    {
        WindowTitle = "Tooltip";

        ToolTip = "This is QWidget";
        Resize(250, 150);
        Move(300, 300);
        Show();
    }

    [STAThread]
    public static int Main(String[] args)
    {
        new QApplication(args);
        new QyotoApp();
        return QApplication.Exec();
    }
}
该示例创建一个窗口。 如果将鼠标指针悬停在窗口区域上方,则会弹出一个工具提示。
using System;
using QtCore;
using QtGui;
using关键字导入我们将在应用中使用的必需品类型。
public class QyotoApp : QWidget {
该示例继承自QWidget。 QWidget 类是所有用户界面对象的基类。 小部件是用户界面的原子。 它从窗口系统接收鼠标,键盘和其他事件。
WindowTitle = "Tooltip";
设置WindowType属性将显示窗口的标题。
ToolTip = "This is QWidget";
我们通过ToolTip属性设置工具提示。
Resize(250, 150);
在这里,我们设置窗口的宽度和高度。
Move(300, 300);
Move()方法在屏幕上移动窗口。
Show();
一切准备就绪后,我们在屏幕上显示窗口。
[STAThread]
public static int Main(String[] args)
Windows 平台上需要[STAThread]属性。 确保与 COM 组件的通信是安全的。 在某些情况下,例如剪贴板和文件对话框,我们正在调用 COM 组件。 没有此属性,应用将崩溃。
new QApplication(args);
new QyotoApp();
return QApplication.Exec();
这三行设置了应用。
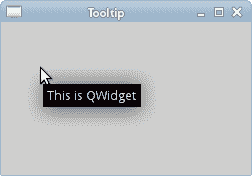
图:工具提示
使窗口居中
在第二个示例中,我们将窗口置于屏幕中央。
using System;
using QtCore;
using QtGui;

/**
 * ZetCode Qyoto C# tutorial
 *
 * This program centers a window
 * on the screen.
 *
 * @author Jan Bodnar
 * website zetcode.com
 * last modified October 2012
 */

public class QyotoApp : QWidget
{
    const int WIDTH = 250;
    const int HEIGHT = 150;

    public QyotoApp()
    {
        WindowTitle = "Center";

        Resize(WIDTH, HEIGHT);
        Center();
        Show();
    }

    private void Center()
    {
        QDesktopWidget qdw = new QDesktopWidget();

        int screenWidth = qdw.Width;
        int screenHeight = qdw.Height;

        int cx = (screenWidth - WIDTH) / 2;
        int cy = (screenHeight - HEIGHT) / 2;

        Move(cx, cy);
    }

    [STAThread]
    public static int Main(String[] args)
    {
        new QApplication(args);
        new QyotoApp();
        return QApplication.Exec();
    }
}
Qyoto 没有使窗口居中的单一方法。
const int WIDTH = 250;
const int HEIGHT = 150;
这两个常数定义了应用窗口的宽度和高度。
Center();
使窗口居中的代码位于Center()方法中。
QDesktopWidget qdw = new QDesktopWidget();
QDesktopWidget类提供有关屏幕的信息。
int screenWidth = qdw.Width();
int screenHeight = qdw.Height();
在这里,我们确定屏幕的宽度和高度。
int cx = (screenWidth - WIDTH) / 2;
int cy = (screenHeight - HEIGHT) / 2;
在这里,我们计算居中窗口的 x,y 坐标。 为了使窗口在屏幕上居中,我们需要知道屏幕的大小和窗口的大小。
Move(cx, cy);
我们将窗口移至计算出的cx,cy坐标。
退出按钮
在本节的最后一个示例中,我们将创建一个退出按钮。 当我们按下此按钮时,应用终止。
using System;
using QtCore;
using QtGui;

/**
 * ZetCode Qyoto C# tutorial
 *
 * This program creates a quit
 * button. When we press the button,
 * the application terminates.
 *
 * @author Jan Bodnar
 * website zetcode.com
 * last modified October 2012
 */

public class QyotoApp : QWidget
{
    public QyotoApp()
    {
        WindowTitle = "Quit button";

        InitUI();

        Resize(250, 150);
        Move(300, 300);
        Show();
    }

    public void InitUI()
    {
        QPushButton quit = new QPushButton("Quit", this);

        Connect(quit, SIGNAL("clicked()"), qApp, SLOT("quit()"));
        quit.SetGeometry(50, 40, 80, 30);
    }

    [STAThread]
    public static int Main(String[] args)
    {
        new QApplication(args);
        new QyotoApp();
        return QApplication.Exec();
    }
}
我们使用QPushButton。 它是矩形的,通常显示一个文本标签。
InitUI();
我们将用户界面的创建委托给InitUI()方法。
QPushButton quit = new QPushButton("Quit", this);
我们创建按钮小部件。 构造器的第一个参数是标签,按钮将显示该标签。 第二个参数是按钮的父窗口小部件。
Connect(quit, SIGNAL("clicked()"), qApp, SLOT("quit()"));
当我们点击按钮时,会发出clicked()信号。 Connect()方法将信号连接到对象的特定槽。 该方法的第一个参数是接收信号的对象。 在我们的例子中,它是应用对象。 第二个参数是方法,称为。 在我们的情况下,它是应用对象的quit()方法。 qApp是对应用对象的全局引用。
quit.SetGeometry(50, 40, 80, 30);
我们定位和调整按钮小部件的大小。 前两个参数是按钮的 x,y 坐标。 最后两个参数是按钮的宽度和高度。
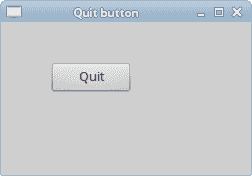
图:退出按钮
本节介绍了使用 C# 语言编写的 Qyoto 库。
